
Belt Verification Requests
The federation has the option to allow Verification Requests for one or many belts. Once enabled, all members of the federation can request a verification on the belt(s) from the federation. The federation can then decide if they want to approve or reject this request based on the data passed along from the member.
Federation Verification settings
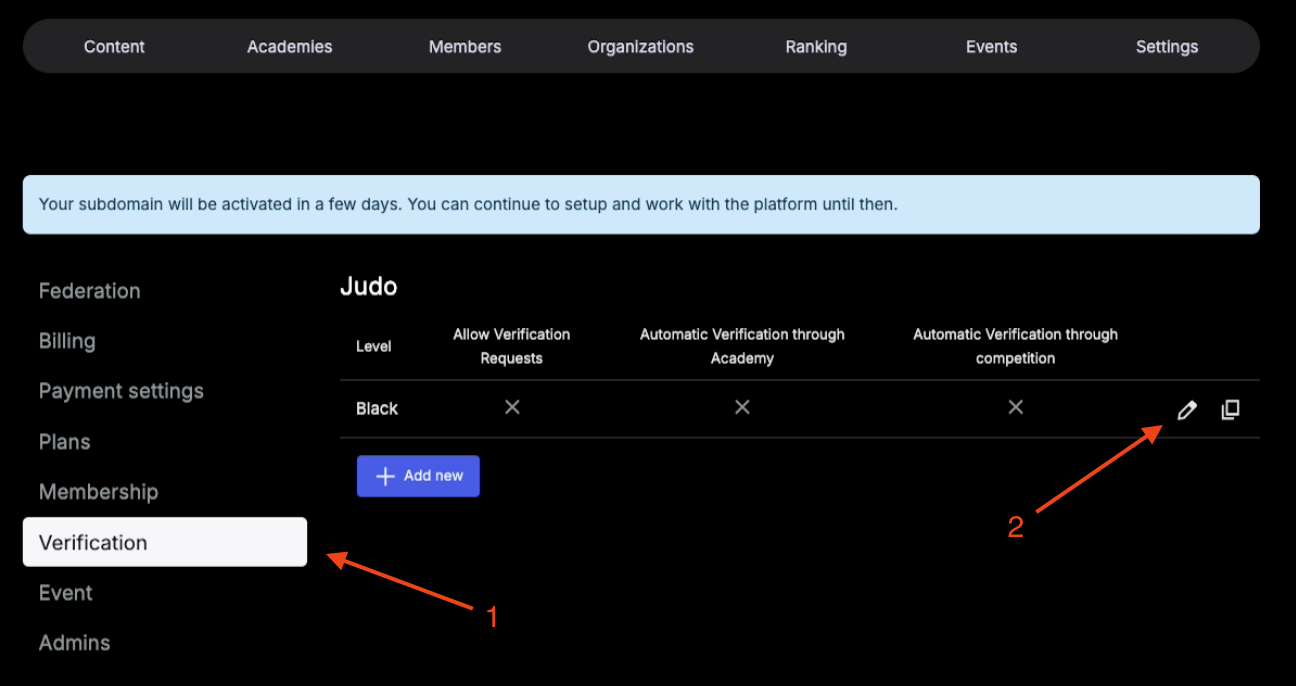
All settings for both Verification Requests and Automatic Verifications are belt specific. This means that each belt has their own settings, allowing you to for example allow Verification Requests for black and brown belts, but not for the rest of the belts. If you wish to have the same settings for multiple belts, you can easily copy a belt setting to another belt once the first one has been created. This is done by from the federation "Verification" settings clicking the far right copy button on the belt in question, and then selecting the belt you wish to copy the settings to in the dialog showing up. Repeat this process as needed.
Enabling Verification Requests
Creating or editing a belt setting
If you don't have any belt setting prior, create a new one by visiting the "Verification" settings under "Federation admin" and clicking the "Add new" button.

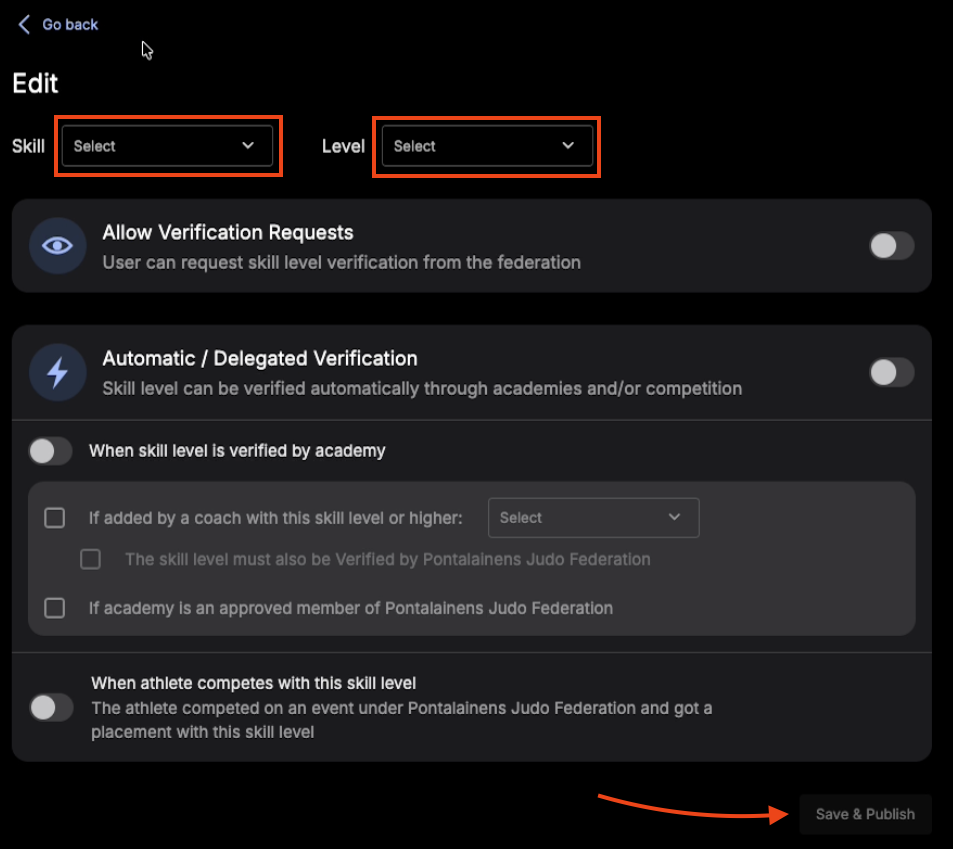
Select the skill and level (belt) and click on "Save & Publish" in the bottom right corner.
If there already is a belt setting you would like to edit, instead click the edit button on the belt in question.
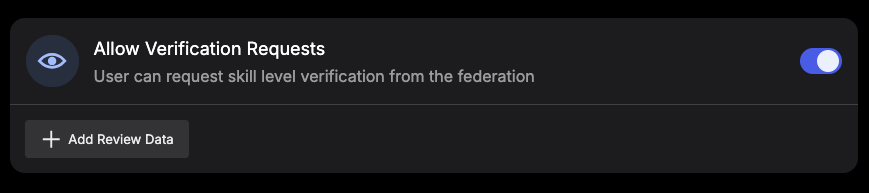
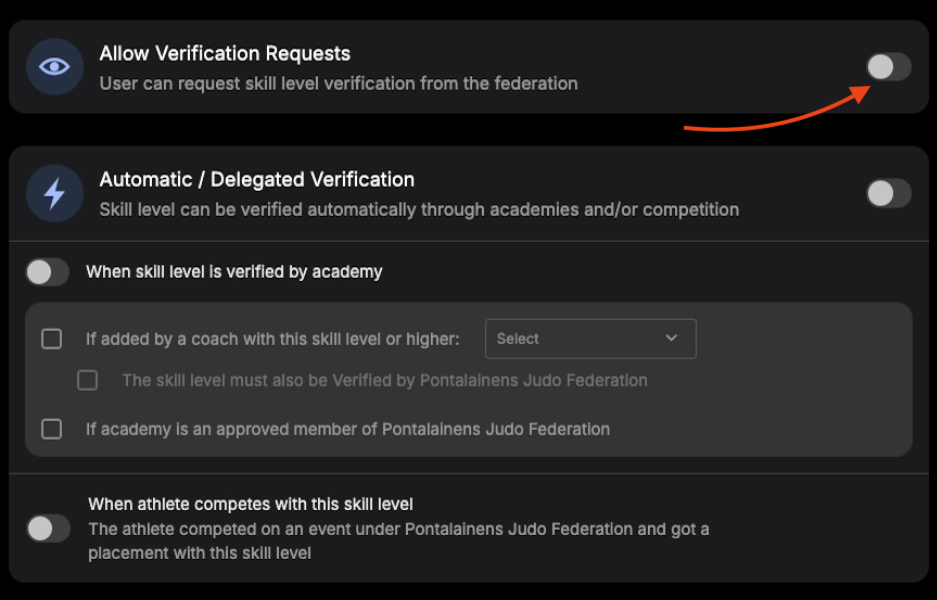
To allow Verification Requests on the belt, check the check box in the top right.
If you wish the members making the request to include data, add a data field by clicking the "Add Review Data" button.

Much like other custom fields on the Smoothcomp platform, there are several inputs for the data field. To have this show up for the member, make sure the bottom "Active" check box is checked. To have the data field being a required input for the member, check the "Required" check box. To save the inputs, click "Save" in the bottom right corner.
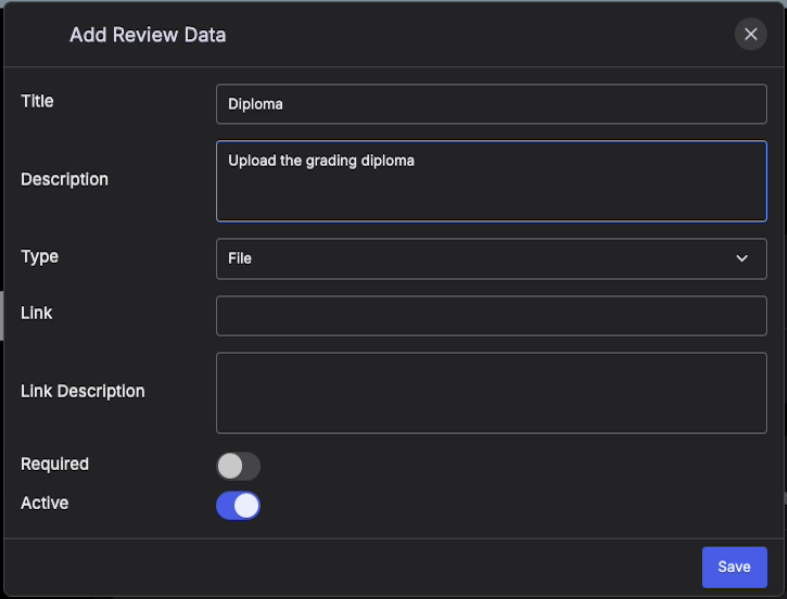
You can add as many or as few data fields as you like, but a tip is to keep it short and concise. The available field types are:
- Text - for a shorter text input
- Text Area - for a longer text input
- File - for a file upload (image and regular document files are allowed)
- Options - for the member to select the appropriate options. When this is selected, another input in the dialog above prompts you to enter the available options
Once you are satisfied with your data field(s), click the "Save & Publish" button in the bottom right of the page.
Requesting a verification
Once the Verification Requests have been allowed from the federation, all members with the enabled belts and no existing verifications on them are now eligible for making a request. To do so, visit your account settings and scroll down to the "Belt/Skill levels" section.
Click the edit button on the belt you wish to request a verification on. If you are a member of multiple federations allowing requests, multiple of these cards might show up.

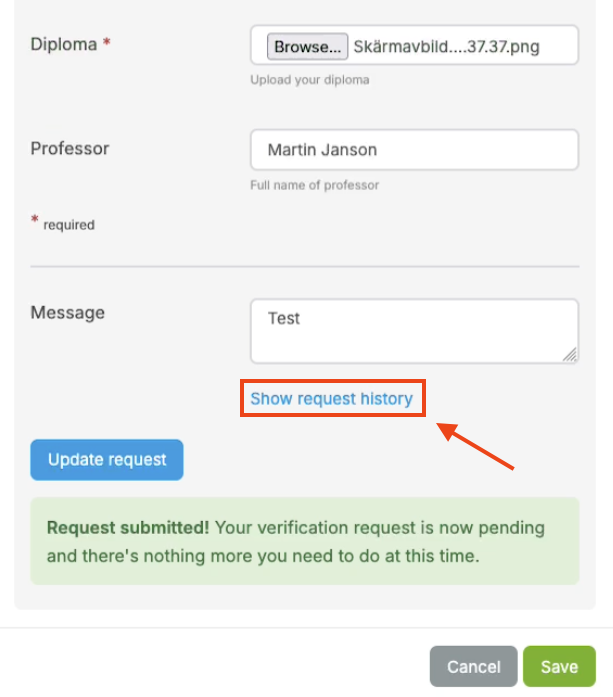
Fill out the possible data fields and then click on "Submit for review" once are satisfied. Note that fields are by default optional, but ones marked with a red star are required to submit the request.

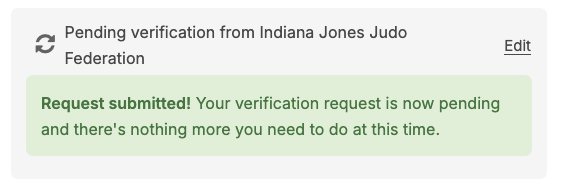
Once you've submitted the request successfully, the card will fold and show this message. To adjust your request, click the "Edit" button at the top right of the card.

To see the history of a request, unfold the card and click the "Show request history" button.
This opens another dialog show the events of the request (directly after submission there's not much to see of course). Each history card shows the history date, status at the time as well as who made the action and a possible note. This is most useful for requests with a longer process and maybe some back and fourths between the parts.

Reviewing a Verification Request
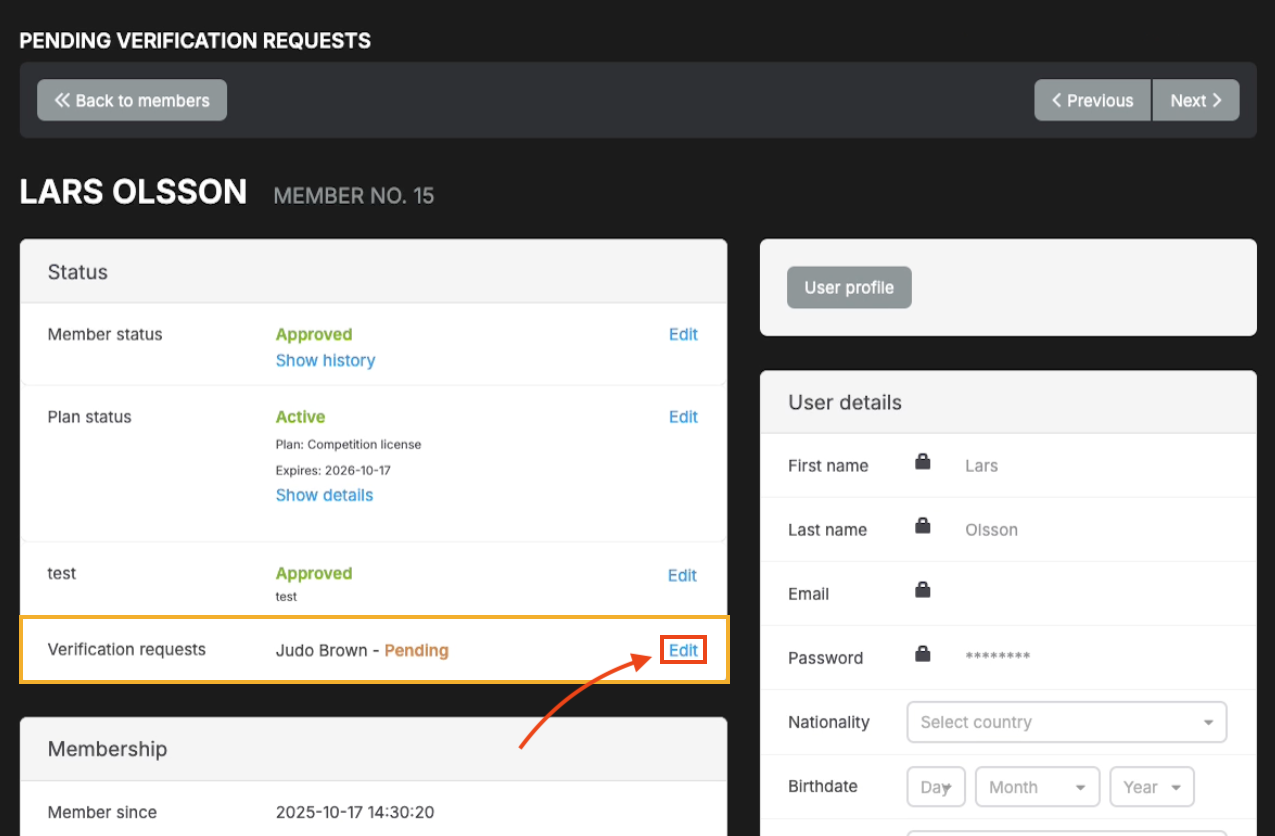
Federation admins have a simply point of entry to review multiple requests in a row, very similar to the membership review process.
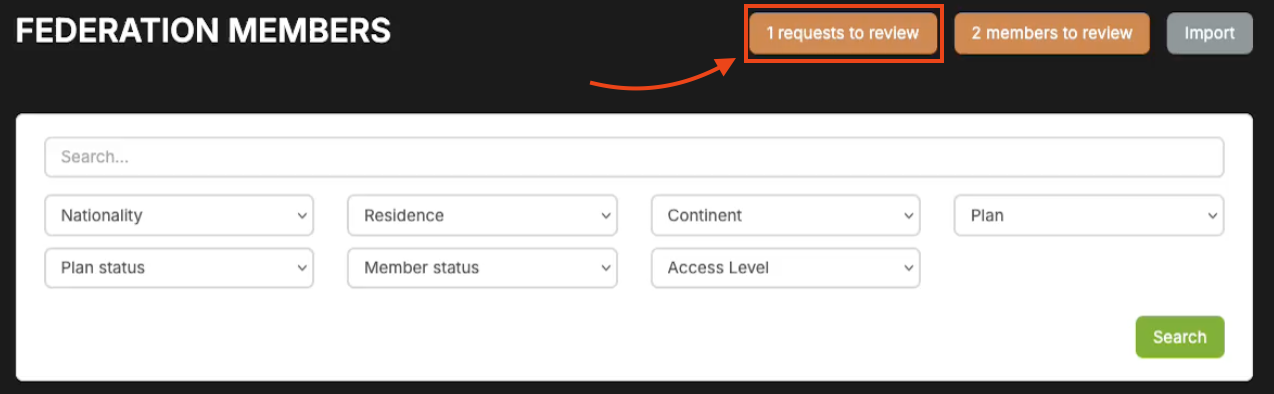
Go to the members page in the federation and click the "x requests to review" (where "x" is the current amount of available reviews).
At the bottom of the "Status" section, the "Verification requests" row will show all current reviews and their statuses. To review a request, click the "Edit" button to the right.
In the dialog, click the "Take action" button at the right of the card to unfold the request card.
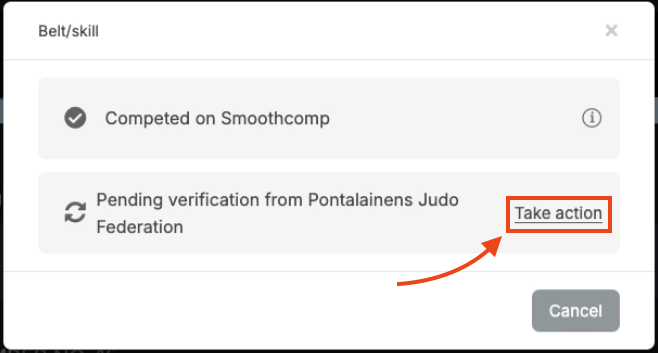
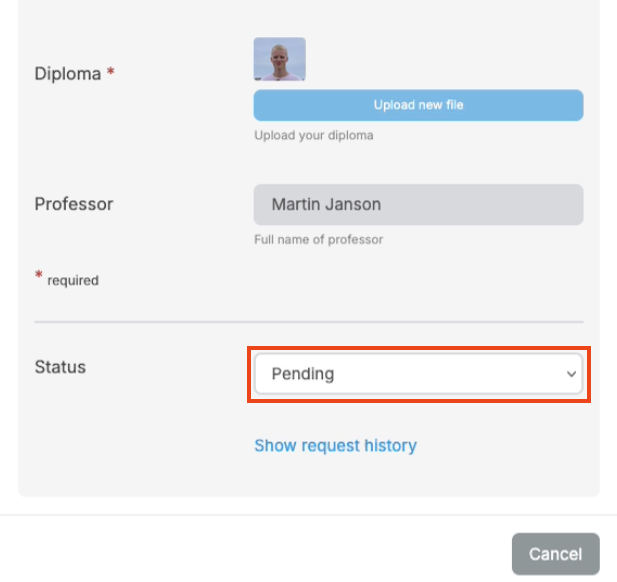
Review the possible data field values and then select either "Approved" or "Rejected" in the status select box. Click "Show request history" to see previous actions on the request if there has been back and fourths between parts.
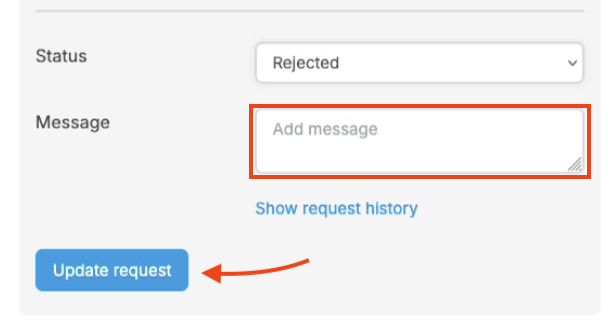
If you choose to reject the request, fill out the message input where you tell the member why the request was denied. If you require any updated values, state them here. Then hit "Update request".
If you instead choose to approve the request, a section similar to the regular verification form shows up. Fill this out as usual and click "Update request".

Once you've updated the request, the card will fold and a message like the once below will show.


Once you update a request, an automated email is sent to the member telling them the request has been rejected or approved as well as instructions on what to do next.
What happens after a request has been rejected?
A rejected request can always be updated and re-submitted by the member. By making sure to clearly instruct the member on what was missing or not making the request eligible for approval, the member can take action and update the information for submission again. If the process includes multiple submissions and actions, the request history dialog is of great help to clearly see what the review contains.
What happens after a request has been approved?
Once a request is approved, it turns into a real verification. This means that an approved request can never be rejected or edited. If you approve a request and need to undo this, you can always do this by simply removing the verification like you would any other. You can not bring it back to a stage where the member can alter their information on the review, but once you've removed the verification they are free to submit a new request.